Love at Fur-Sight Bandanna

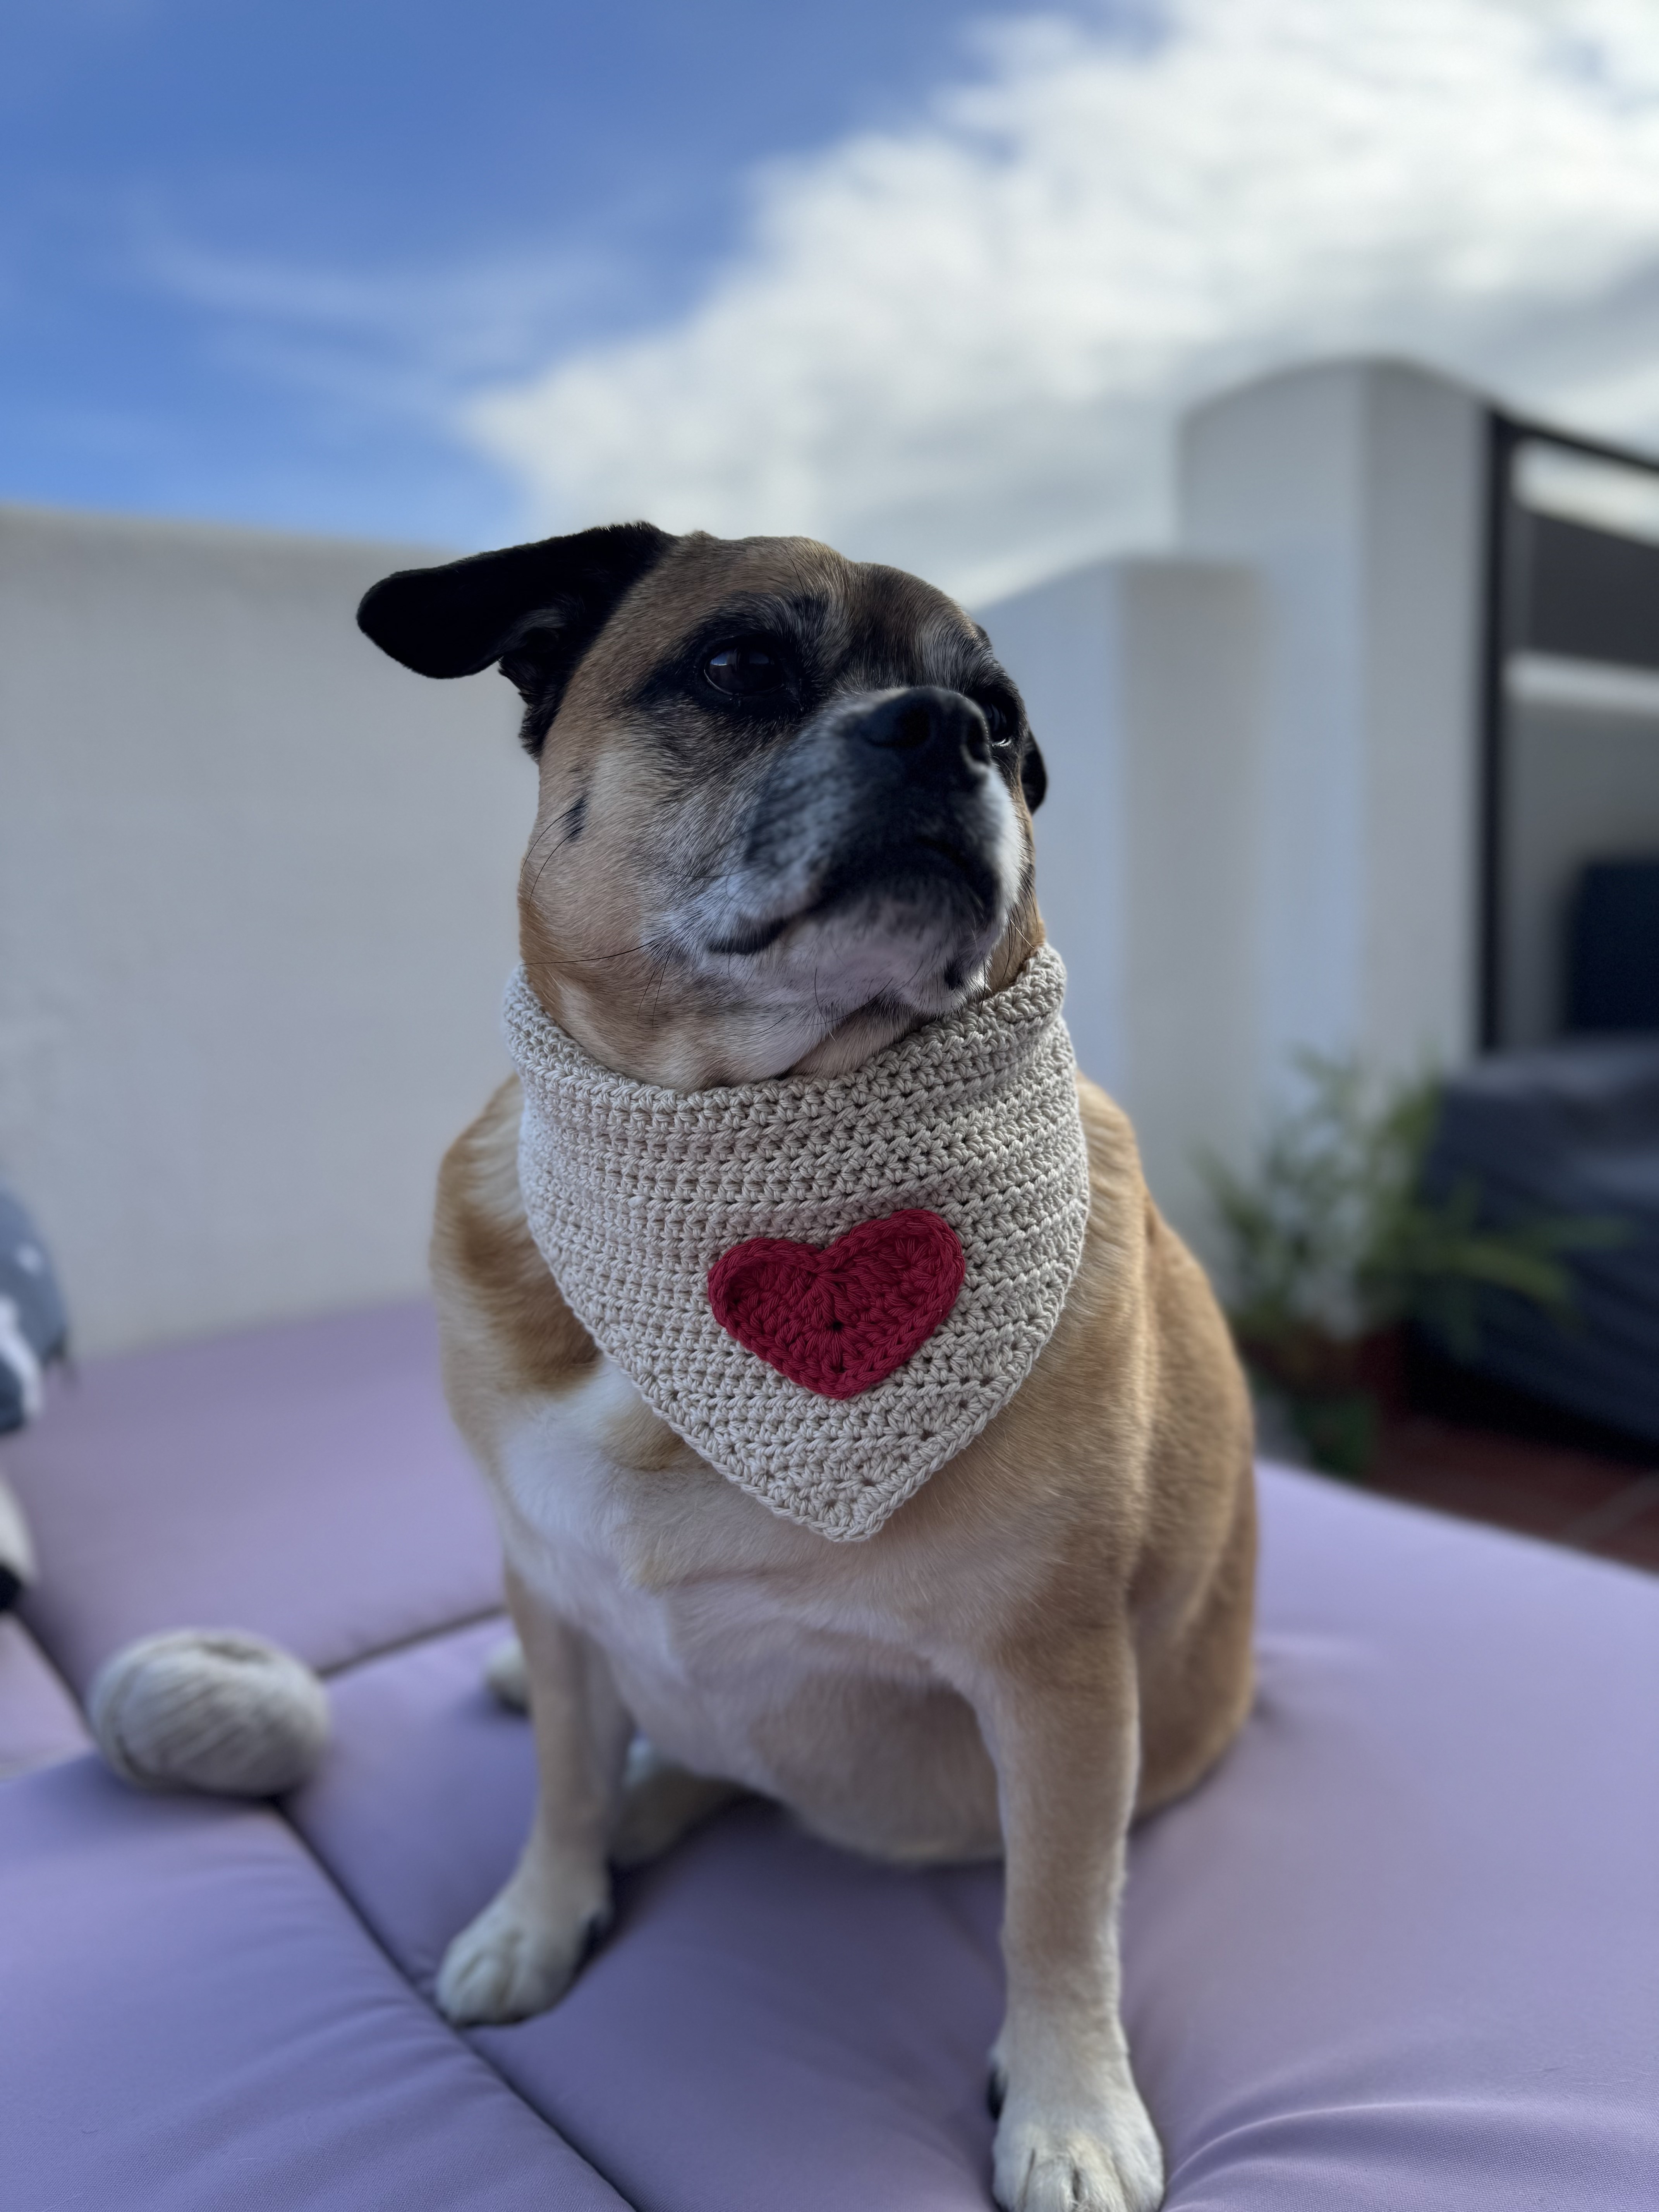
This adorable design is perfect for cats, dogs, and other furry friends who deserve a lot of love and a wardrobe that shows it. Hence its name, the ‘Love at Fur-Sight’ bandanna features an adorable heart appliqué – it’s a super cute handmade accessory that’s perfect for Valentine’s Day, photo shoots, or everyday wear!
This beginner-friendly pattern is worked in rows using basic crochet stitches and the size is fully customizable.
Grab your yarn and hook—let’s make something special for your best friend!
| Materials | |
| Yarn: | Paintbox Yarns Cotton DK Vanilla Cream (408) – 1x 50g ball; Red or Pink – scrap ends |
| Hook: | 4 mm |
| Other: | Yarn needle; beads (optional). |
| Abbreviations (US) | |
| Ch | Chain |
| St | Stitch |
| Sl-st | Slip stitch |
| Sk | Skip |
| yo | Yarn over |
| Sc | Single crochet |
| Dc | Double crochet |
| Hdc | Half Dc |
| Dec | Decrease |
| Inc | Increase |
IMPORTANT PATTERN NOTES
CUSTOM FIT
Every pet is unique in species, shape, size, and proportions. For that reason, this pattern does not include fixed measurements. Instead, it’s designed to be fully customizable—simply continue adding rows until you reach the size you need.
The Love at Fur-Sight Pet Bandanna is worked in rows to form a wide triangle. To adjust for your pet, just stop adding rows when the bandanna reaches the desired width and length. This makes it easy to create a perfect fit for any furry friend!
YARN CHOICE
Since the size is completely customizable, the yarn choice is too! Feel free to use any yarn you like—the pattern works best with weights ranging from light/medium to bulky. For comfort and safety, choose soft, non-irritating fibres that are gentle on your pet’s skin, such as cotton or acrylic blends.
SPECIAL STITCHES
4Dc-dec: *Yo, insert hook into the next Ch, yo, and pull up loop, yo and pull through two loops on hook (i.e. first half of a Dc)*, working into the Ch stitch repeat from * to *, skip the next Ch, working into the Ch stitch repeat from * to * twice – there are now a total of 5 loops on the hook, yo and pull through all 5 loops on hook. This decreases the count by 4 sts.

https://www.youtube.com/@hookedandtaylored
STEP 1: MAKE THE BANDANNA
The bandanna is worked up as a wide triangle and is crochet in flat rows.
FCR: Ch 2
Row 1: Hdc-inc in 2nd ch from the hook. Ch2, turn [2]
Row 2: Hdc-inc in each st. Ch2, turn [4]
Row 3: [Dc, Hdc] in 1st st, 2 Hdc-inc, [Hdc, Dc] in last st. Ch2, turn [8]
Row 4: [Dc, Hdc] in 1st st, 6 Hdc, [Hdc, Dc] in last st. Ch2, turn [10]
Row 5: [Dc, Hdc] in 1st st, Hdc-inc in next st, Hdc across until there are 2 sts left, Hdc-inc in next st, [Hdc, Dc] in last st. Ch2, turn [14].
Row 6: [Dc, Hdc] in 1st st, Hdc across until last st, [Hdc, Dc] in last st. Ch2, turn [16].
Repeat rows 5-6 until you have a triangle that is the desired width for your pet’s neck and it reaches the length that you want. On the final repeat of row 6, Ch1 and turn.
The last row neatens the edge of the bandanna and is work as a joined round.
Edge round: Sc-inc in first st, Sc each st until last st, Sc-inc in last st. Ch2. Do not turn. Rotate your piece to crochet along the side. Sc-inc in the same st, Sc evenly along the side until the centre point of the bandanna, Sc-inc in centre st (rotate your piece), Sc evenly along the other side of the bandanna, Sc-inc in last st, Ch2 (rotate your piece), Sl-st to the first Sc st made in this the edge round.
Fasten off and weave in ends.


STEP 2: MAKE THE HEART APPLIQUÉ
- The heart appliqué is worked in joined rounds. Do not turn.
- Picture tutorial included after written instructions.
FCR: Ch 13
Round 1: Dc in the 3rd Ch from the hook, 2 Dc (i.e. Dc in each of the next 2 Chs), make a 4Dc-dec over the next 5 Chs (see “special stitches” notes at the beginning of this pattern), 2 Dc (i.e. Dc in each of the next 2 Chs), [6 Dc] into the next Ch (rotate your piece halfway – after 3 sts – to crochet across the opposite side of the FCR), 4 Dc (i.e. Dc into each of the next 4 Chs), [2 Dc, Ch 1, 2 Dc] into the next Ch, 4 Dc (i.e. Dc into each of the next 4 Chs), [5 DC] into the last Ch (the last ch that was already worked into at the very beginning of this round). Sl-st into the first Dc to join.
Round 2: Sl-st around until the Ch1-sp, [Sl-st, Ch1, Sl-st] in Ch-sp, Sl-st around and into the top of the first st to join.
Fasten off and leave a long tail end for sewing.
Thread the tail end into your yarn needle. Stitch the heart on to the front of the bandanna.
Top Tip: don’t pull your tension too tight.


STEP 3: MAKE THE NECK TIE
You can add beads to the neck tie ends for an extra decorative touch. However, only use beads if you’re absolutely sure your pet won’t chew on them or risk choking. Safety first! Always exercise caution and supervise your pet while wearing the bandanna if you decide to embellish it with beads.
FCR: Ch as many as you like to reach your desired length of the neck tie.
OPTION 1: Adding beads: Fasten off here and thread your yarn tails through your bead of choice. Secure the beads with a knot on each side (tie your knots multiple times, they must be bigger than the bead holes). Move the bead up the chains to give yourself some space to weave the yarn tails into the chain. Slide the beads down to the knot to secure.
OPTION 2: Not adding beads: Sc in 2nd Ch from the hook and each Ch across until the end. Fasten off and weave in your ends.

And there you have it—Love at Fur-sight!
Your handmade bandanna is complete and ready to wear. Now it’s time for your furry friend to model their new look! Don’t forget to share a photo and tag me on Instagram so I can see your adorable creations!
Russell (my dog, pictured above) would also love to see your furry little sweethearts rocking their new bandanna, so please tag him too!
Instagram:
@hookedandtaylored
@russell_the_pugx
Woodland Shroom Forager Bandanna
Bring a touch of forest magic to your pet’s wardrobe with this whimsical bandanna adorned with charming toadstool and mushroom appliqués. Perfect for nature lovers and their furry companions, this pattern combines cozy crochet with playful woodland vibes. Whether your pet is a curious explorer or just loves looking adorable, this customizable design ensures a perfect fit for any size.
This beginner-friendly pattern is worked in rows using basic crochet stitches.
Grab your yarn and hook—let’s make something special for your best friend!
| Materials | |
| Yarn: | Paintbox Yarns Cotton Aran: Elephant Grey (661) – 1x 50g ball Red and Cream or White – scrap ends |
| Hook: | 5 mm |
| Other: | Yarn needle; button (optional). |
| Abbreviations (US) | |
| Ch | Chain |
| St | Stitch |
| Sl-st | Slip stitch |
| Sk | Skip |
| yo | Yarn over |
| Sc | Single crochet |
| Dc | Double crochet |
| Hdc | Half Dc |
| Dec | Decrease |
| Inc | Increase |
IMPORTANT PATTERN NOTES
CUSTOM FIT
Every pet is unique in species, shape, size, and proportions. For that reason, this pattern does not include fixed measurements. Instead, it’s designed to be fully customizable—simply continue adding rows until you reach the size you need.
The Woodland Shroom Forager Pet Bandanna is worked in rows to form a wide triangle. To adjust for your pet, just stop adding rows when the bandanna reaches the desired width and length. This makes it easy to create a perfect fit for any furry friend!
YARN CHOICE
Since the size is completely customizable, the yarn choice is too! Feel free to use any yarn you like—the pattern works best with weights ranging from light to medium. For comfort and safety, choose soft, non-irritating fibres that are gentle on your pet’s skin, such as cotton blends.
https://www.youtube.com/@hookedandtaylored
STEP 1: MAKE THE BANDANNA
The bandanna is worked up as a wide triangle and is crochet in flat rows.
FCR: Ch 2
Row 1: Hdc-inc in 2nd ch from the hook. Ch2, turn [2]
Row 2: Hdc-inc in each st. Ch2, turn [4]
Row 3: [Dc, Hdc] in 1st st, 2 Hdc-inc, [Hdc, Dc] in last st. Ch2, turn [8]
Row 4: [Dc, Hdc] in 1st st, 6 Hdc, [Hdc, Dc] in last st. Ch2, turn [10]
Row 5: [Dc, Hdc] in 1st st, Hdc-inc in next st, Hdc across until there are 2 sts left, Hdc-inc in next st, [Hdc, Dc] in last st. Ch2, turn [14].
Row 6: [Dc, Hdc] in 1st st, Hdc across until last st, [Hdc, Dc] in last st. Ch2, turn [16].
Repeat rows 5-6 until you have a triangle that is the desired width for your pet’s neck and it reaches the length that you want.
The last row neatens the edge of the bandanna and is work as a joined round.
Edge round: Dc-inc in first st, Dc each st until last st, Dc-inc in last st. Ch2. Do not turn. Rotate your piece to crochet along the side. Dc-inc in the same st, Dc evenly along the side until the centre point of the bandanna, 4 Dc in centre st (rotate your piece), Dc evenly along the other side of the bandanna, Dc-inc in last st, Ch2 (rotate your piece), Sl-st to the first Dc st made in this the edge round.
Fasten off and weave in ends.

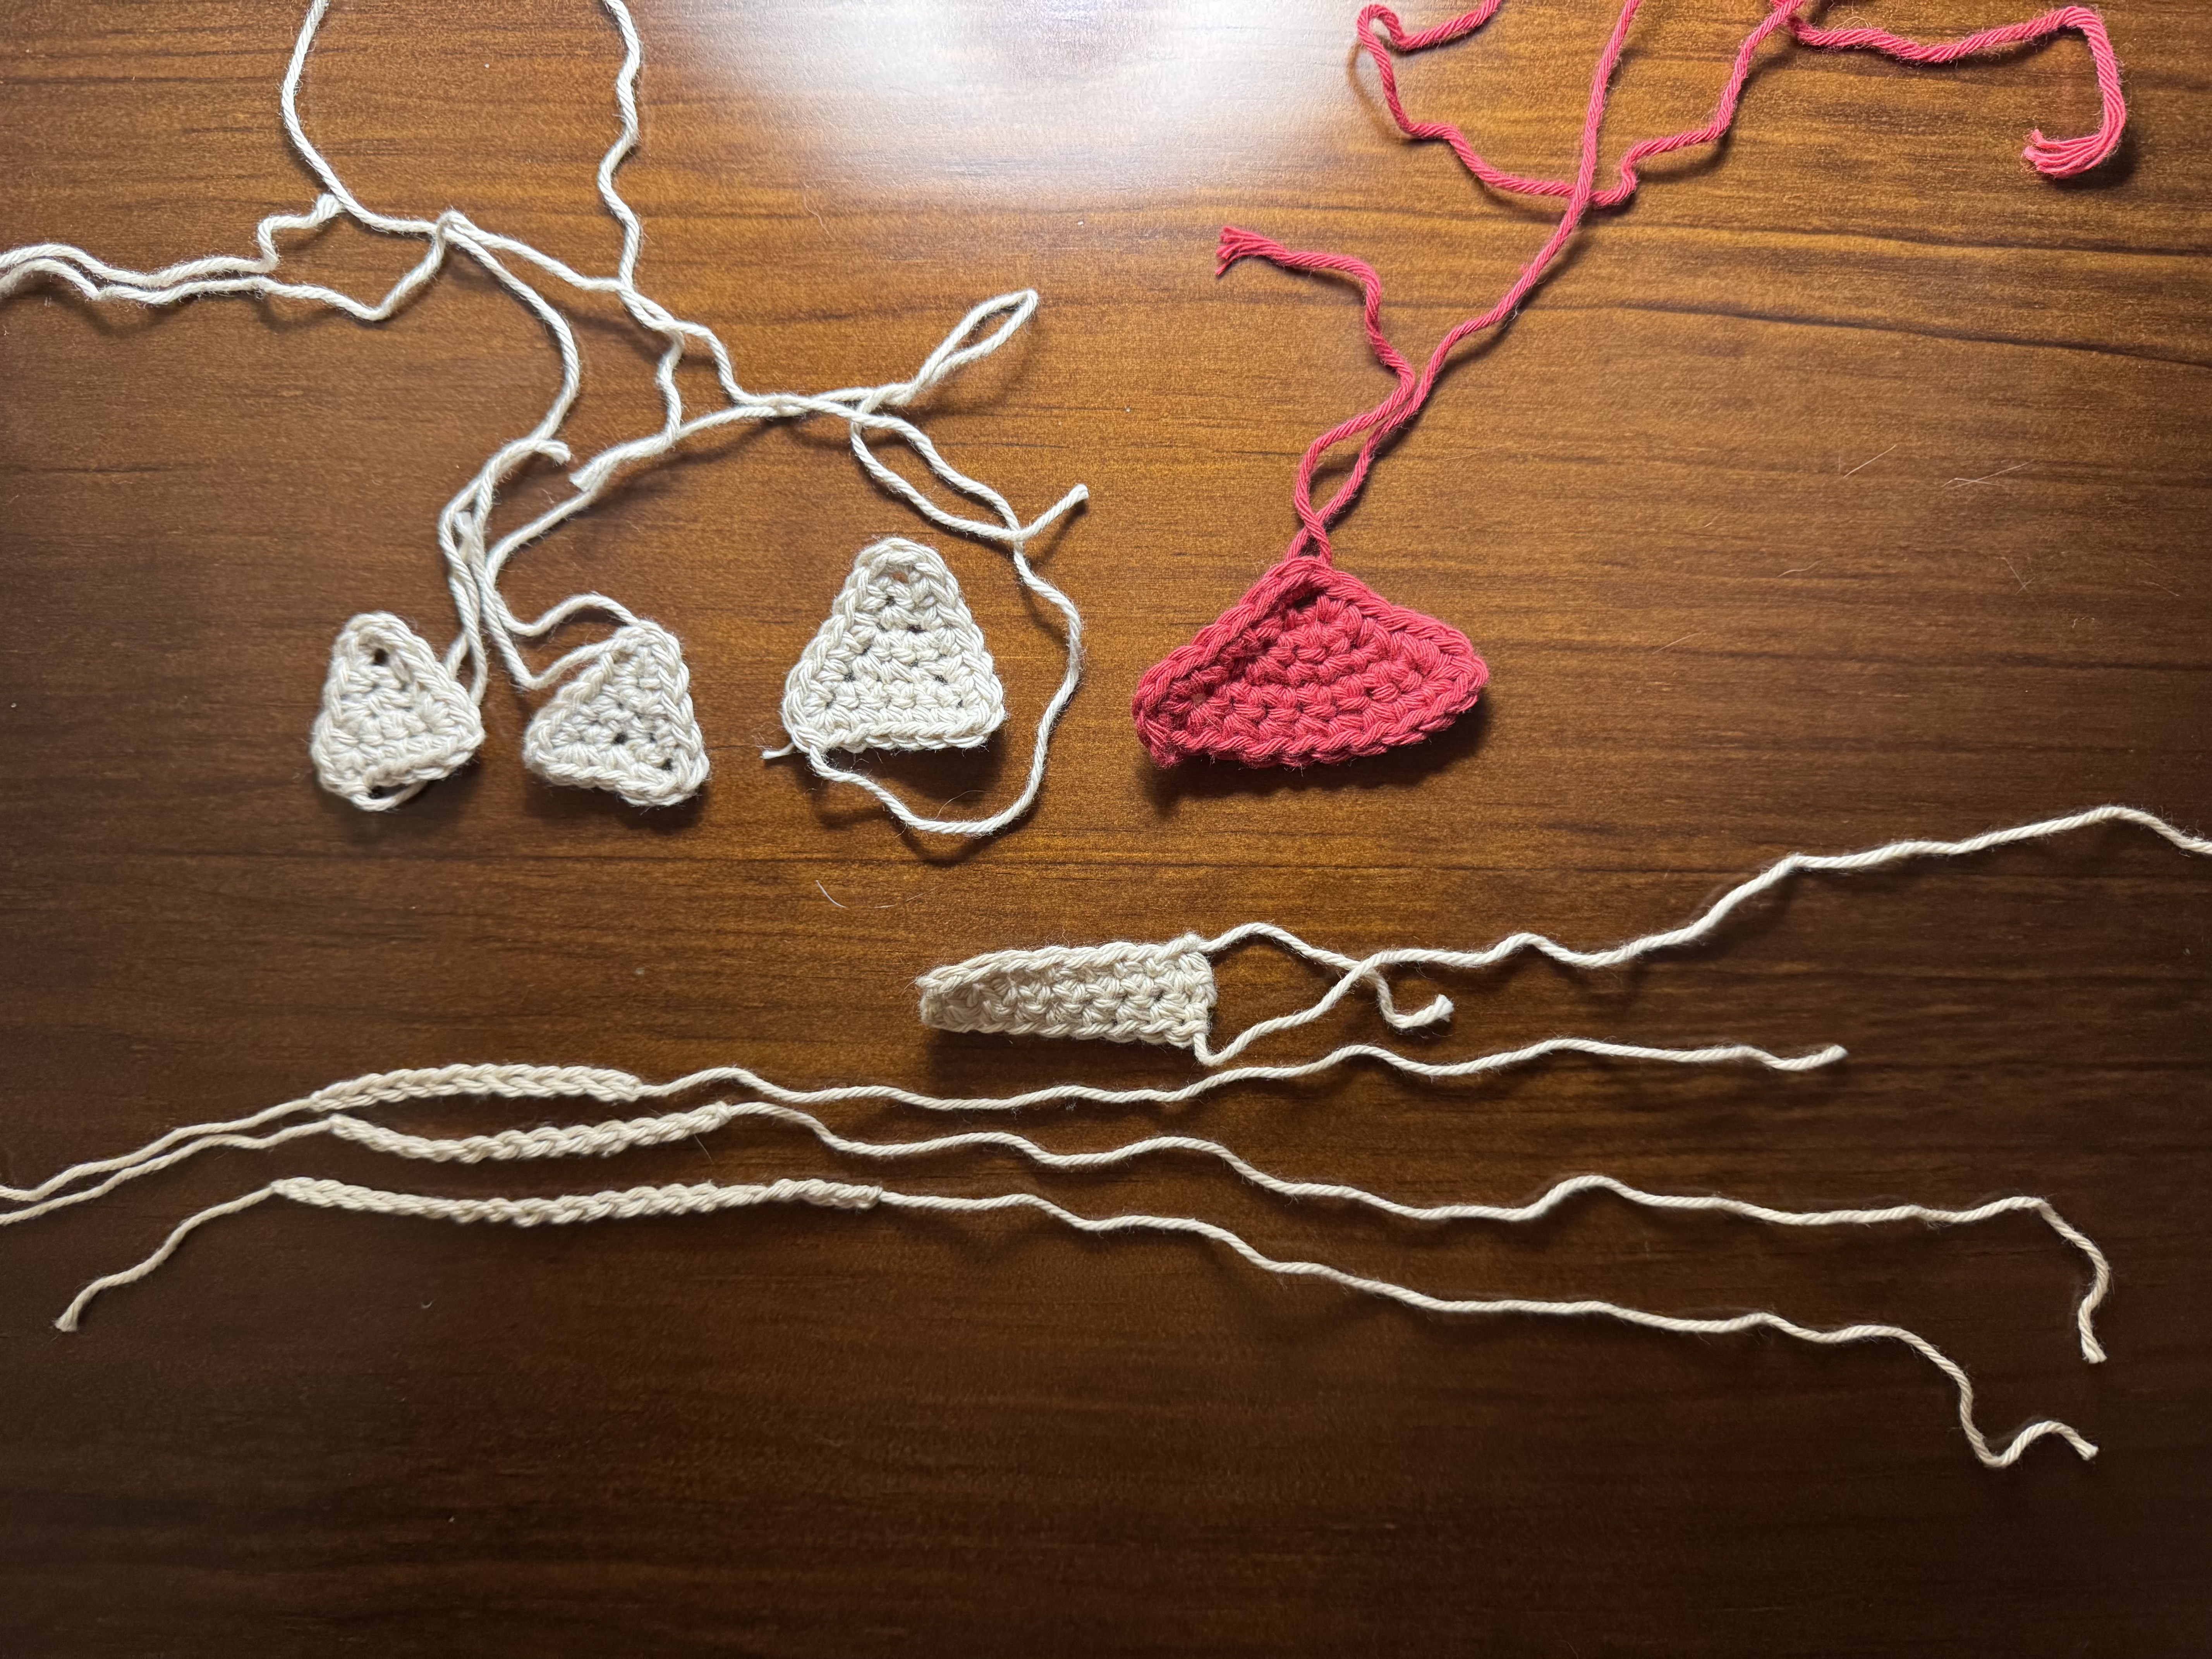
STEP 2: MAKE THE TOADSTOOL APPLIQUÉ
TOADSTOOL CAP
IN RED YARN
FCR: Ch 2
Row 1: Sc-inc in 2nd ch from the hook. Ch1, turn [2]
Row 2: Sc-inc in each st. Ch1, turn [4]
Row 3: Sc-inc in 1st st, 2 sc, Sc-inc in last st. Ch1, turn [6]
Row 4: Sc-inc in 1st st, 4 sc, Sc-inc in last st. Ch1, DO NOT TURN [8].
Edge Round: Sc-inc (in same st as last st in row 4), Sc evenly across until the tip of the mushroom cap (Ch1 of FCR), [3 Sc] in Ch1 of FCR (rotate your work), Sc evenly across until last st, Sc-inc in last st, Ch1, Sl-st to first Sc to join.
Fasten off and leave a long tail end for sewing.
STEM
IN CREAM OR WHITE YARN
FCR: Ch 9
Row 1: Sc in 2nd ch from the hook and each Ch across. Ch1, turn [8]
Row 2: Sc in each st across. Ch1, turn [8]
Row 3: Sc in each st across. [8]
Fasten off and leave a long tail end for sewing.
STEP 3: MAKE THE SHROOM APPLIQUÉS
CAPS (make x2)
IN CREAM OR WHITE YARN
FCR: Ch 2
Row 1: Sc-inc in 2nd ch from the hook. Ch1, turn [2]
Row 2: Sc in each st. Ch1, turn [2]
Row 3: Sc-inc in each st. Ch1, turn [4]
Row 4: Sc in each st. Ch1, turn [4]
Row 5: Sc-inc in 1st st, 2 sc, Sc-inc in last st. Ch1, turn [6]
Row 6: Sc in each st. Ch1, DO NOT TURN [6]
Edge Round: Sc-inc (in same st as last st in row 4), Sc evenly across until the tip of the mushroom cap (Ch1 of FCR), [3 Sc] in Ch1 of FCR (rotate your work), Sc evenly across until last st, Sc-inc in last st, Ch1, Sl-st to first Sc to join.
Fasten off and leave a long tail end for sewing.
STEMS (make x2)
IN CREAM OR WHITE YARN
FCR: Ch 12
Fasten off and leave a long tail end for sewing.
LARGER CAP (make x1)
IN CREAM OR WHITE YARN
FCR: Ch 2
Row 1: Sc-inc in 2nd ch from the hook. Ch1, turn [2]
Row 2: Sc in each st. Ch1, turn [2]
Row 3: Sc-inc in each st. Ch1, turn [4]
Row 4: Sc in each st. Ch1, turn [4]
Row 5: Sc-inc in 1st st, 2 sc, Sc-inc in last st. Ch1, turn [6]
Row 6: Sc in each st. Ch1, turn [6]
Row 4: Sc-inc in 1st st, 4 sc, Sc-inc in last st. Ch1, DO NOT TURN [8].
Edge Round: Sc-inc (in same st as last st in row 4), Sc evenly across until the tip of the mushroom cap (Ch1 of FCR), [3 Sc] in Ch1 of FCR (rotate your work), Sc evenly across until last st, Sc-inc in last st, Ch1, Sl-st to first Sc to join.
Fasten off and leave a long tail end for sewing.
LARGER STEM (make x1)
IN CREAM OR WHITE YARN
FCR: Ch 20
Fasten off and leave a long tail end for sewing.
STEP 4: ASSEMBLE AND ATTACH APPLIQUÉS
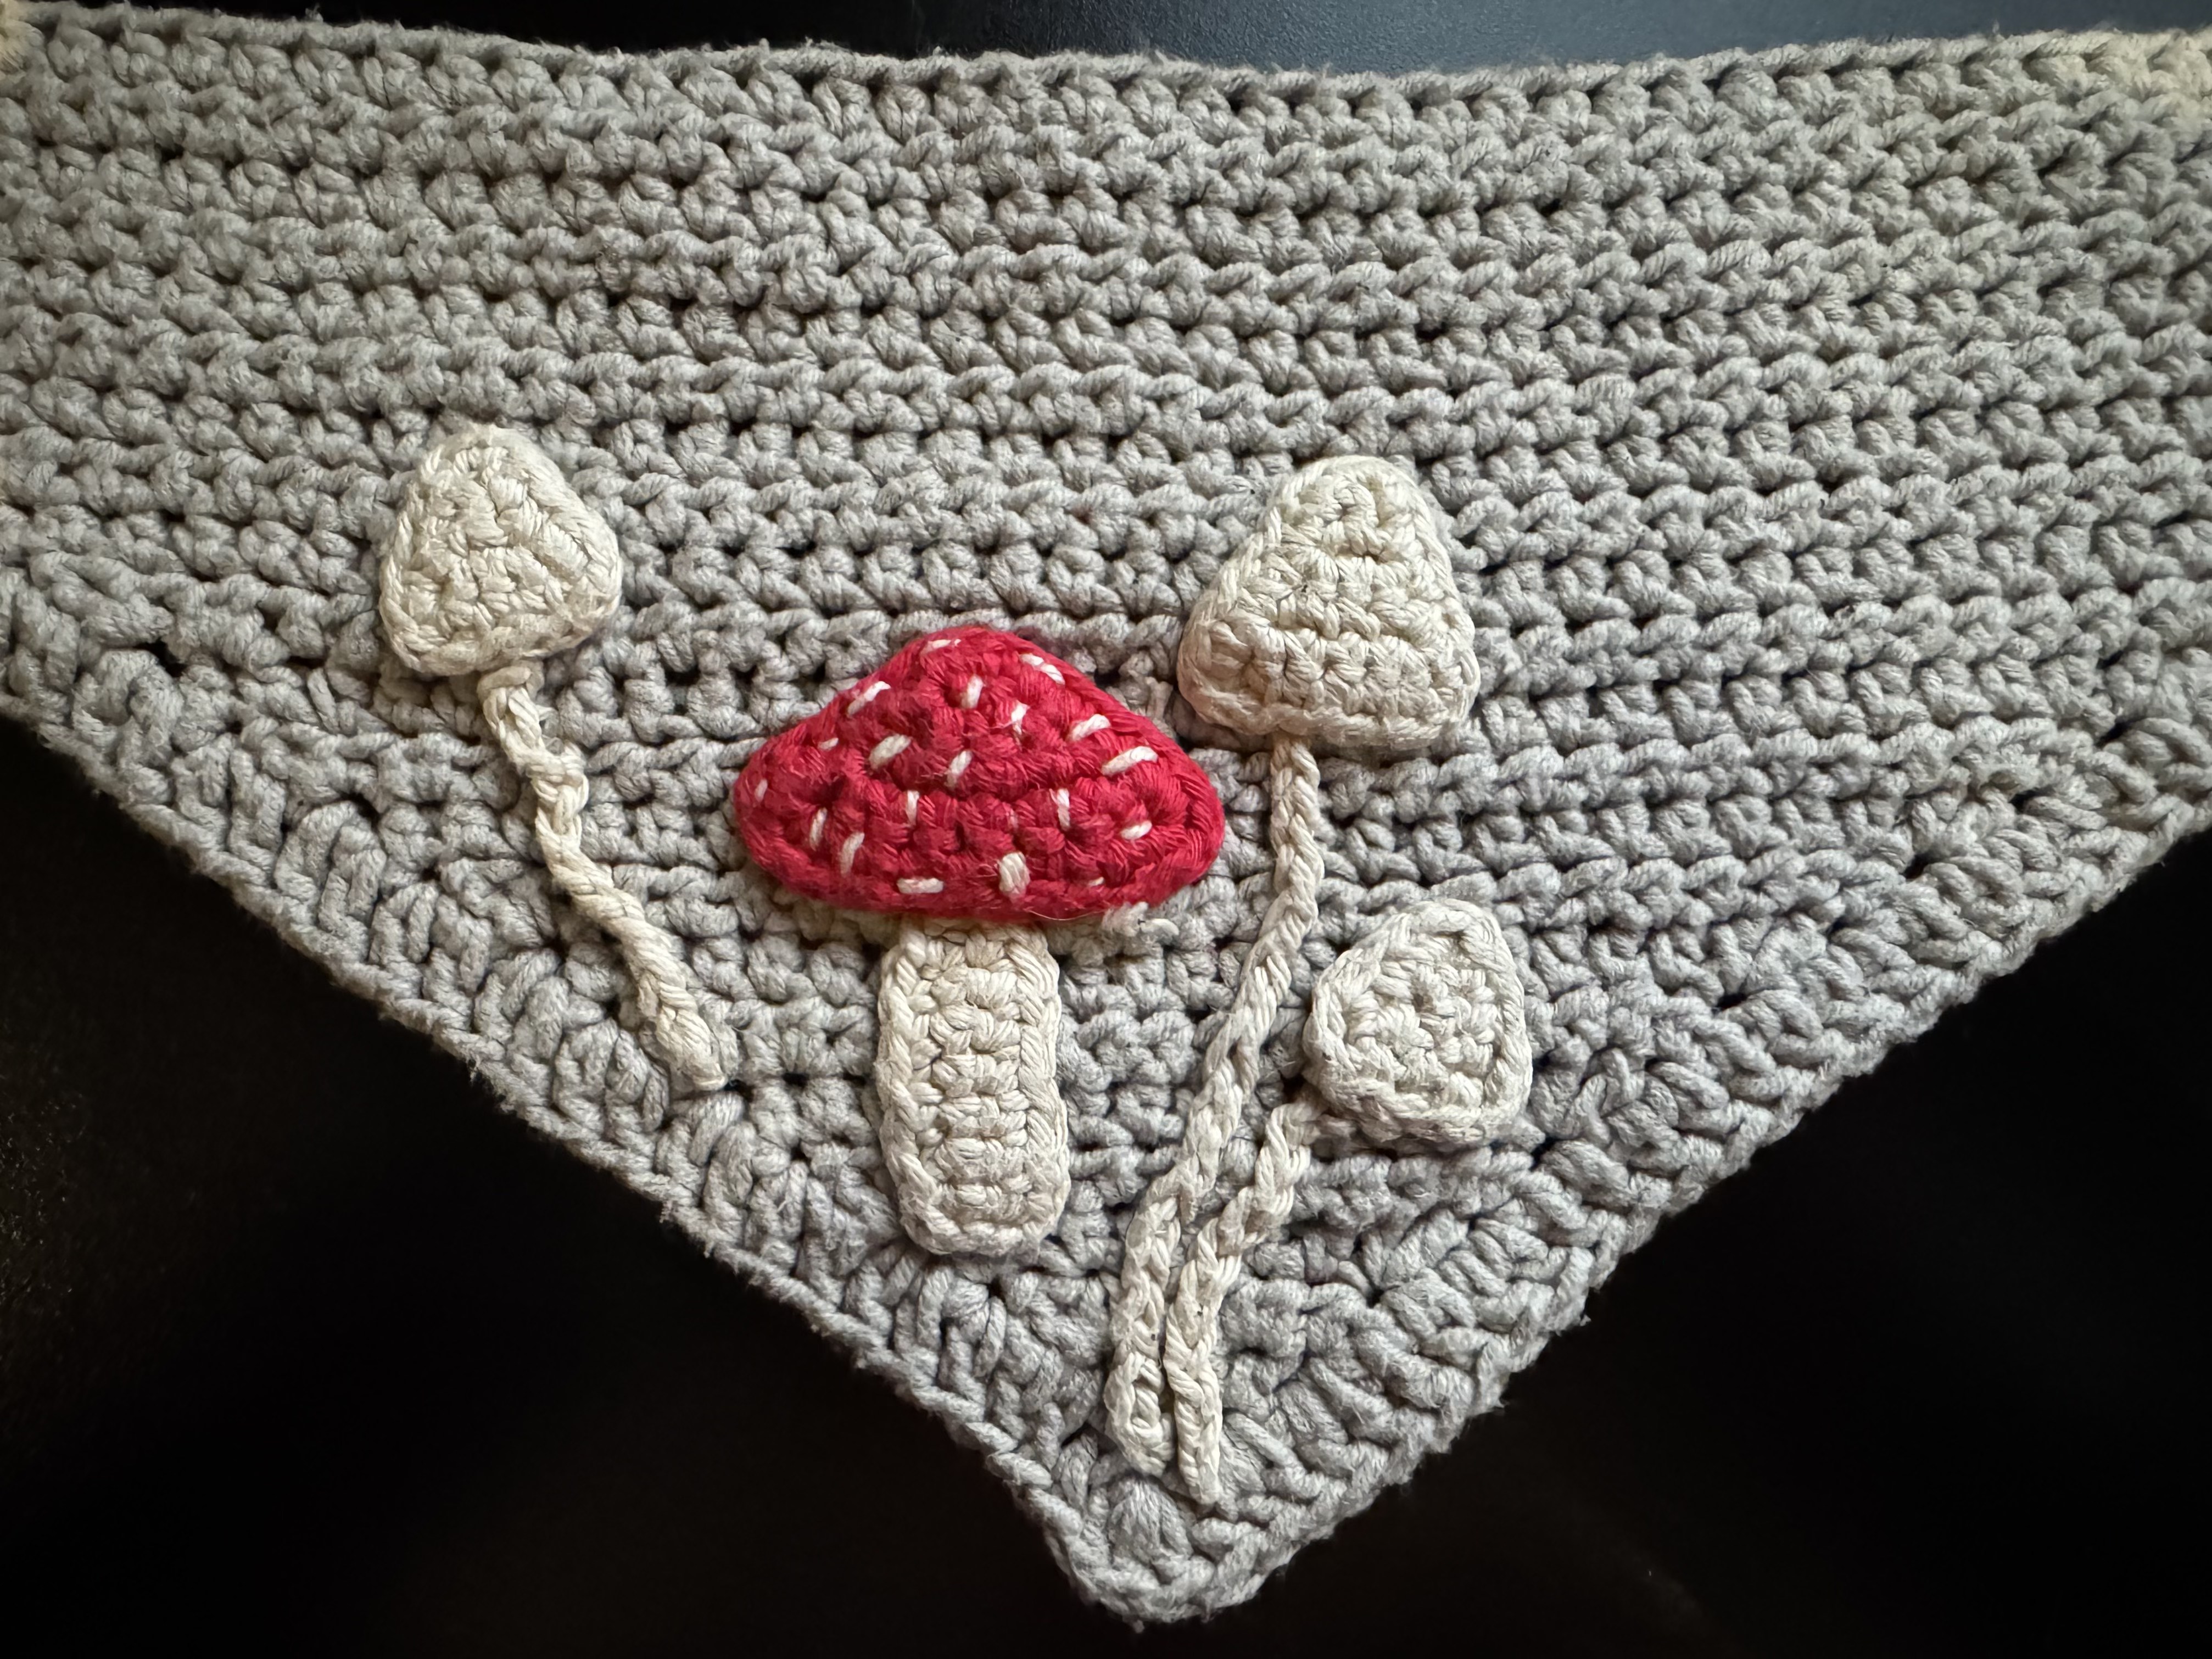
Assemble the appliqués as desired and stitch to the bandanna with the tail ends using a yarn needle. Add decorative stitches to add ‘dots’ to the cap of the toadstool.
Top Tip: don’t pull your tension too tight.
Secure and weave in ends.
STEP 5: FINISHING TOUCHES
You can add a button for an extra decorative touch. However, only use a button if you’re absolutely sure your pet won’t chew on it or risk choking. Safety first! Always exercise caution and supervise your pet while wearing the bandanna if you decide to embellish it with a button.
OPTION 1: Adding a button: Thread your tail end into a yarn needle and stitch on a button of choice. Make sure your button snuggly fits through your Ch2 corner in order to secure the bandanna closed.
OPTION 2: Neck tie: Ch as many as you like to reach your desired length of the neck tie. Sc in 2nd Ch from the hook and each Ch across until the end. Fasten off and weave in your ends.
OPTION 3: Stitch closed: Thread your tail end into a yarn needle and stitch the corners of the bandanna together. Note that you will need to fit the bandanna over your pet’s head to take it on/off as this option permanently closes it.
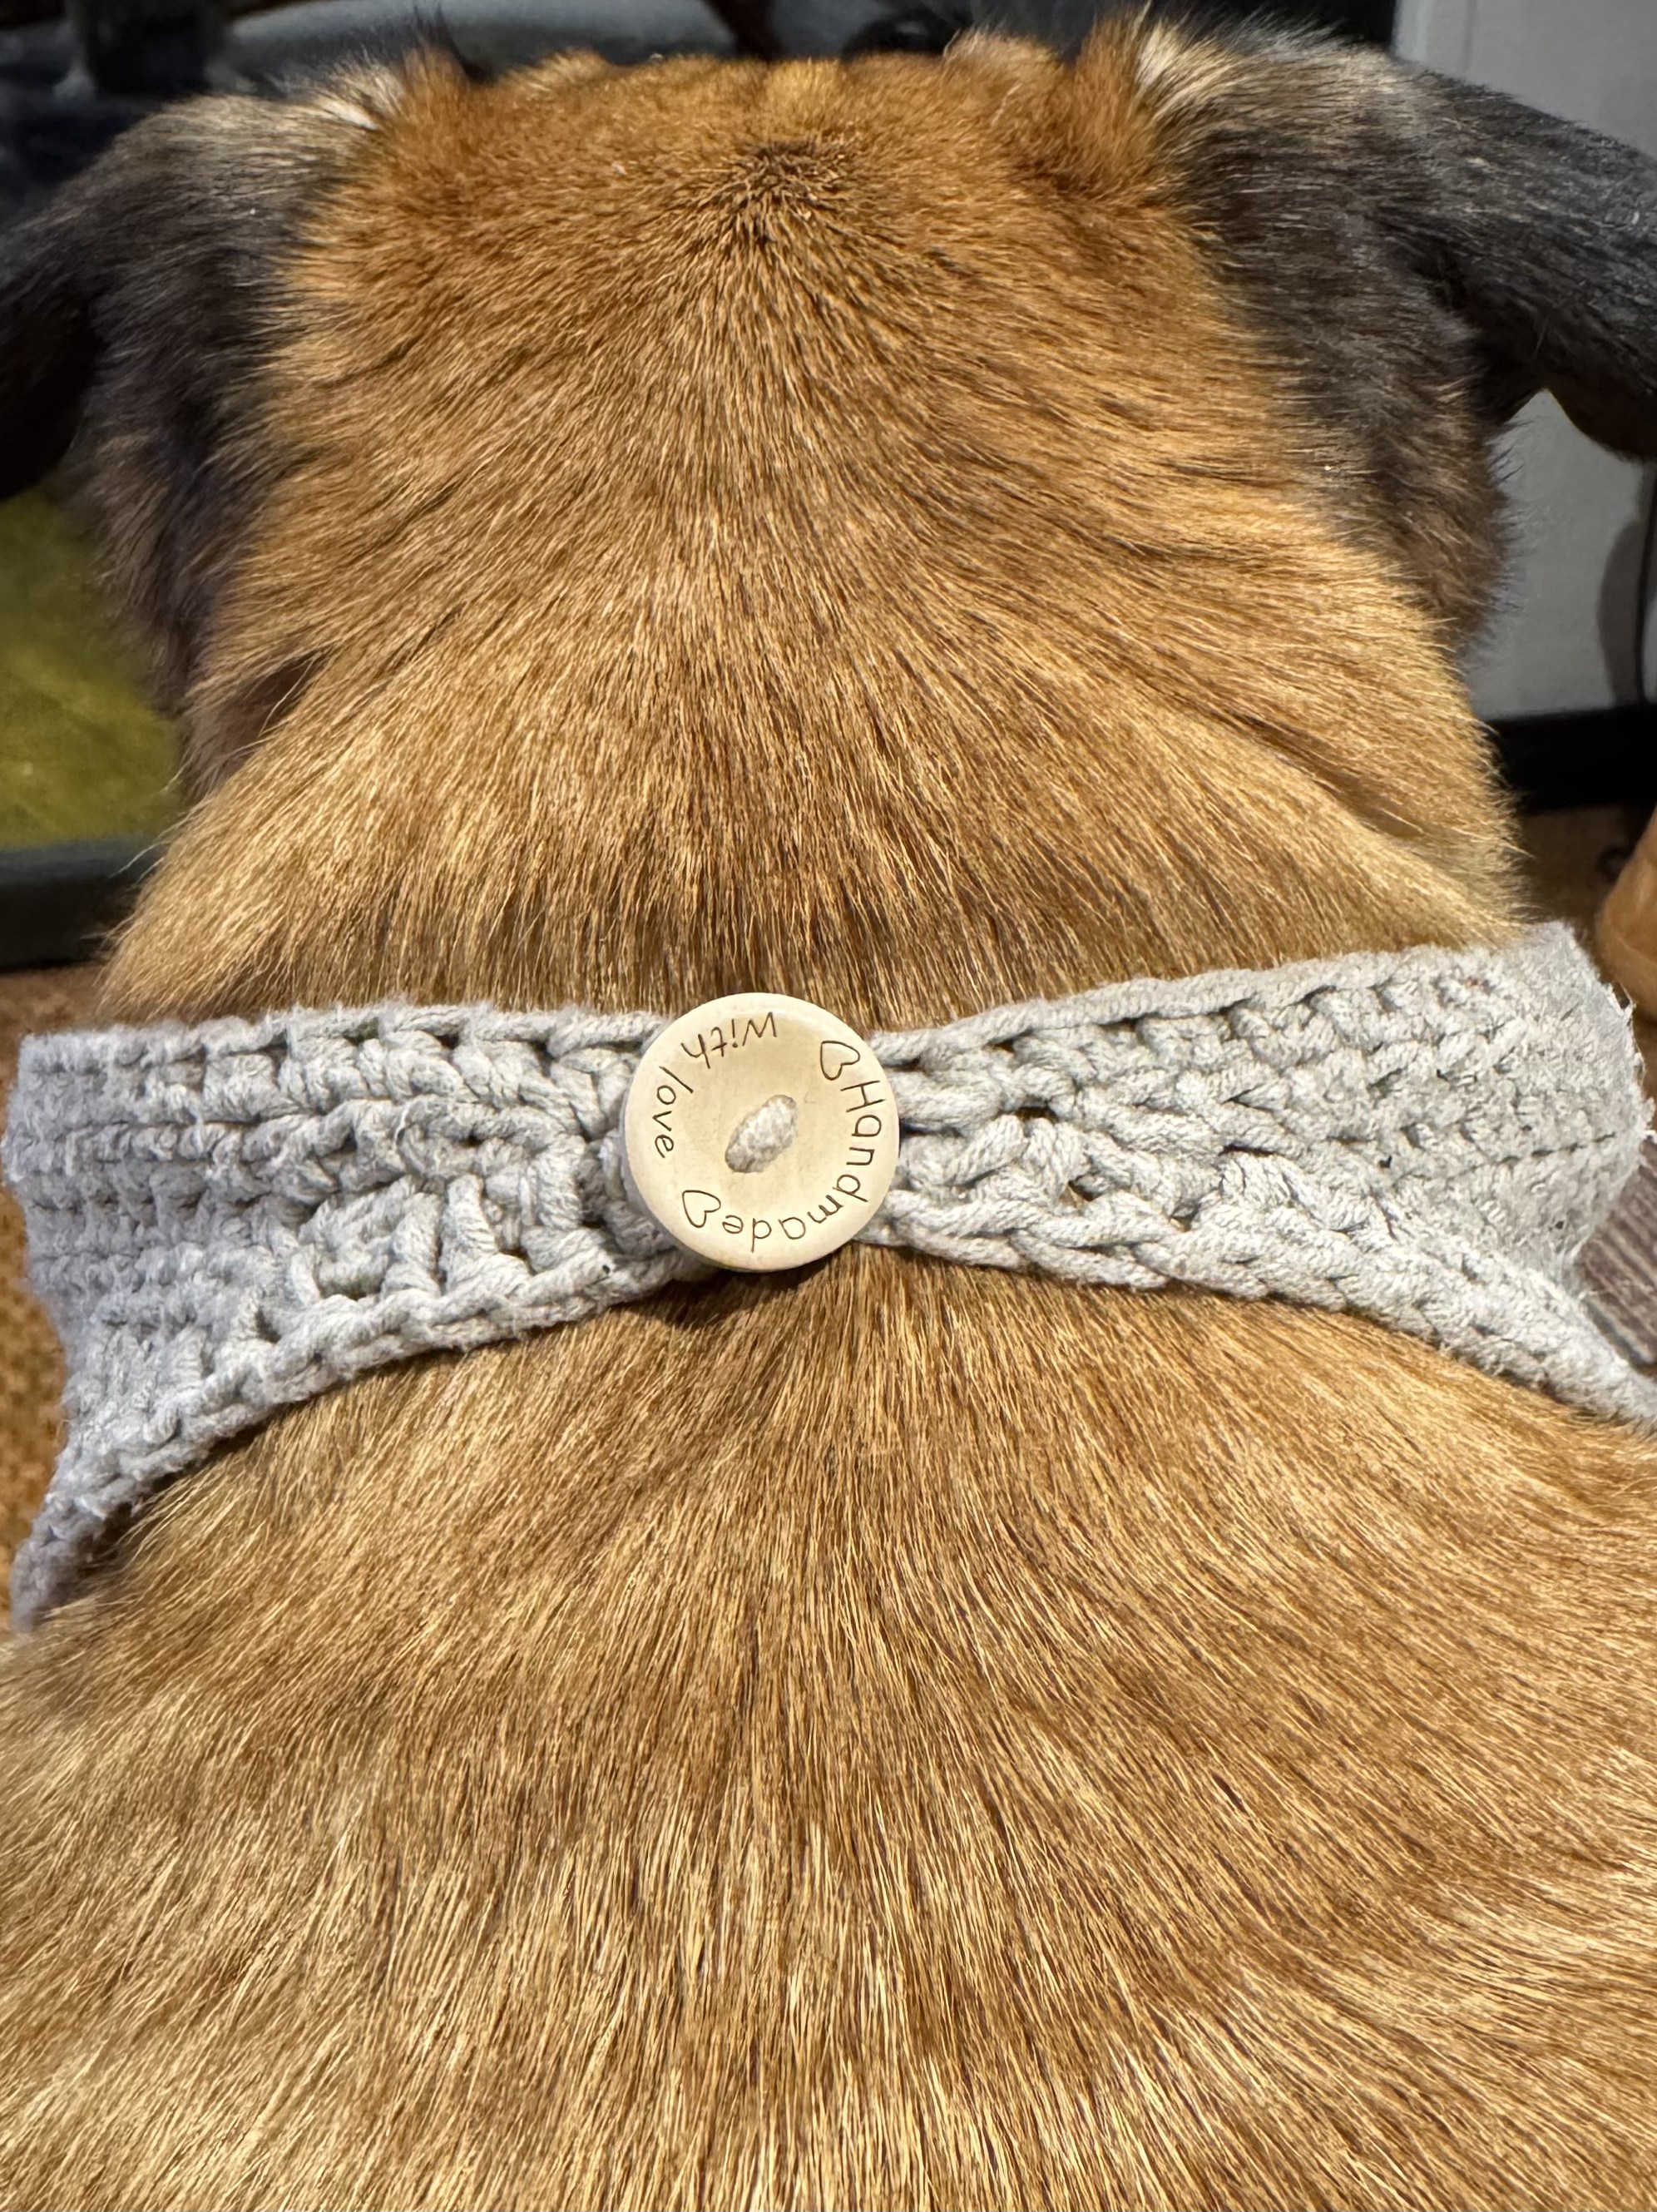
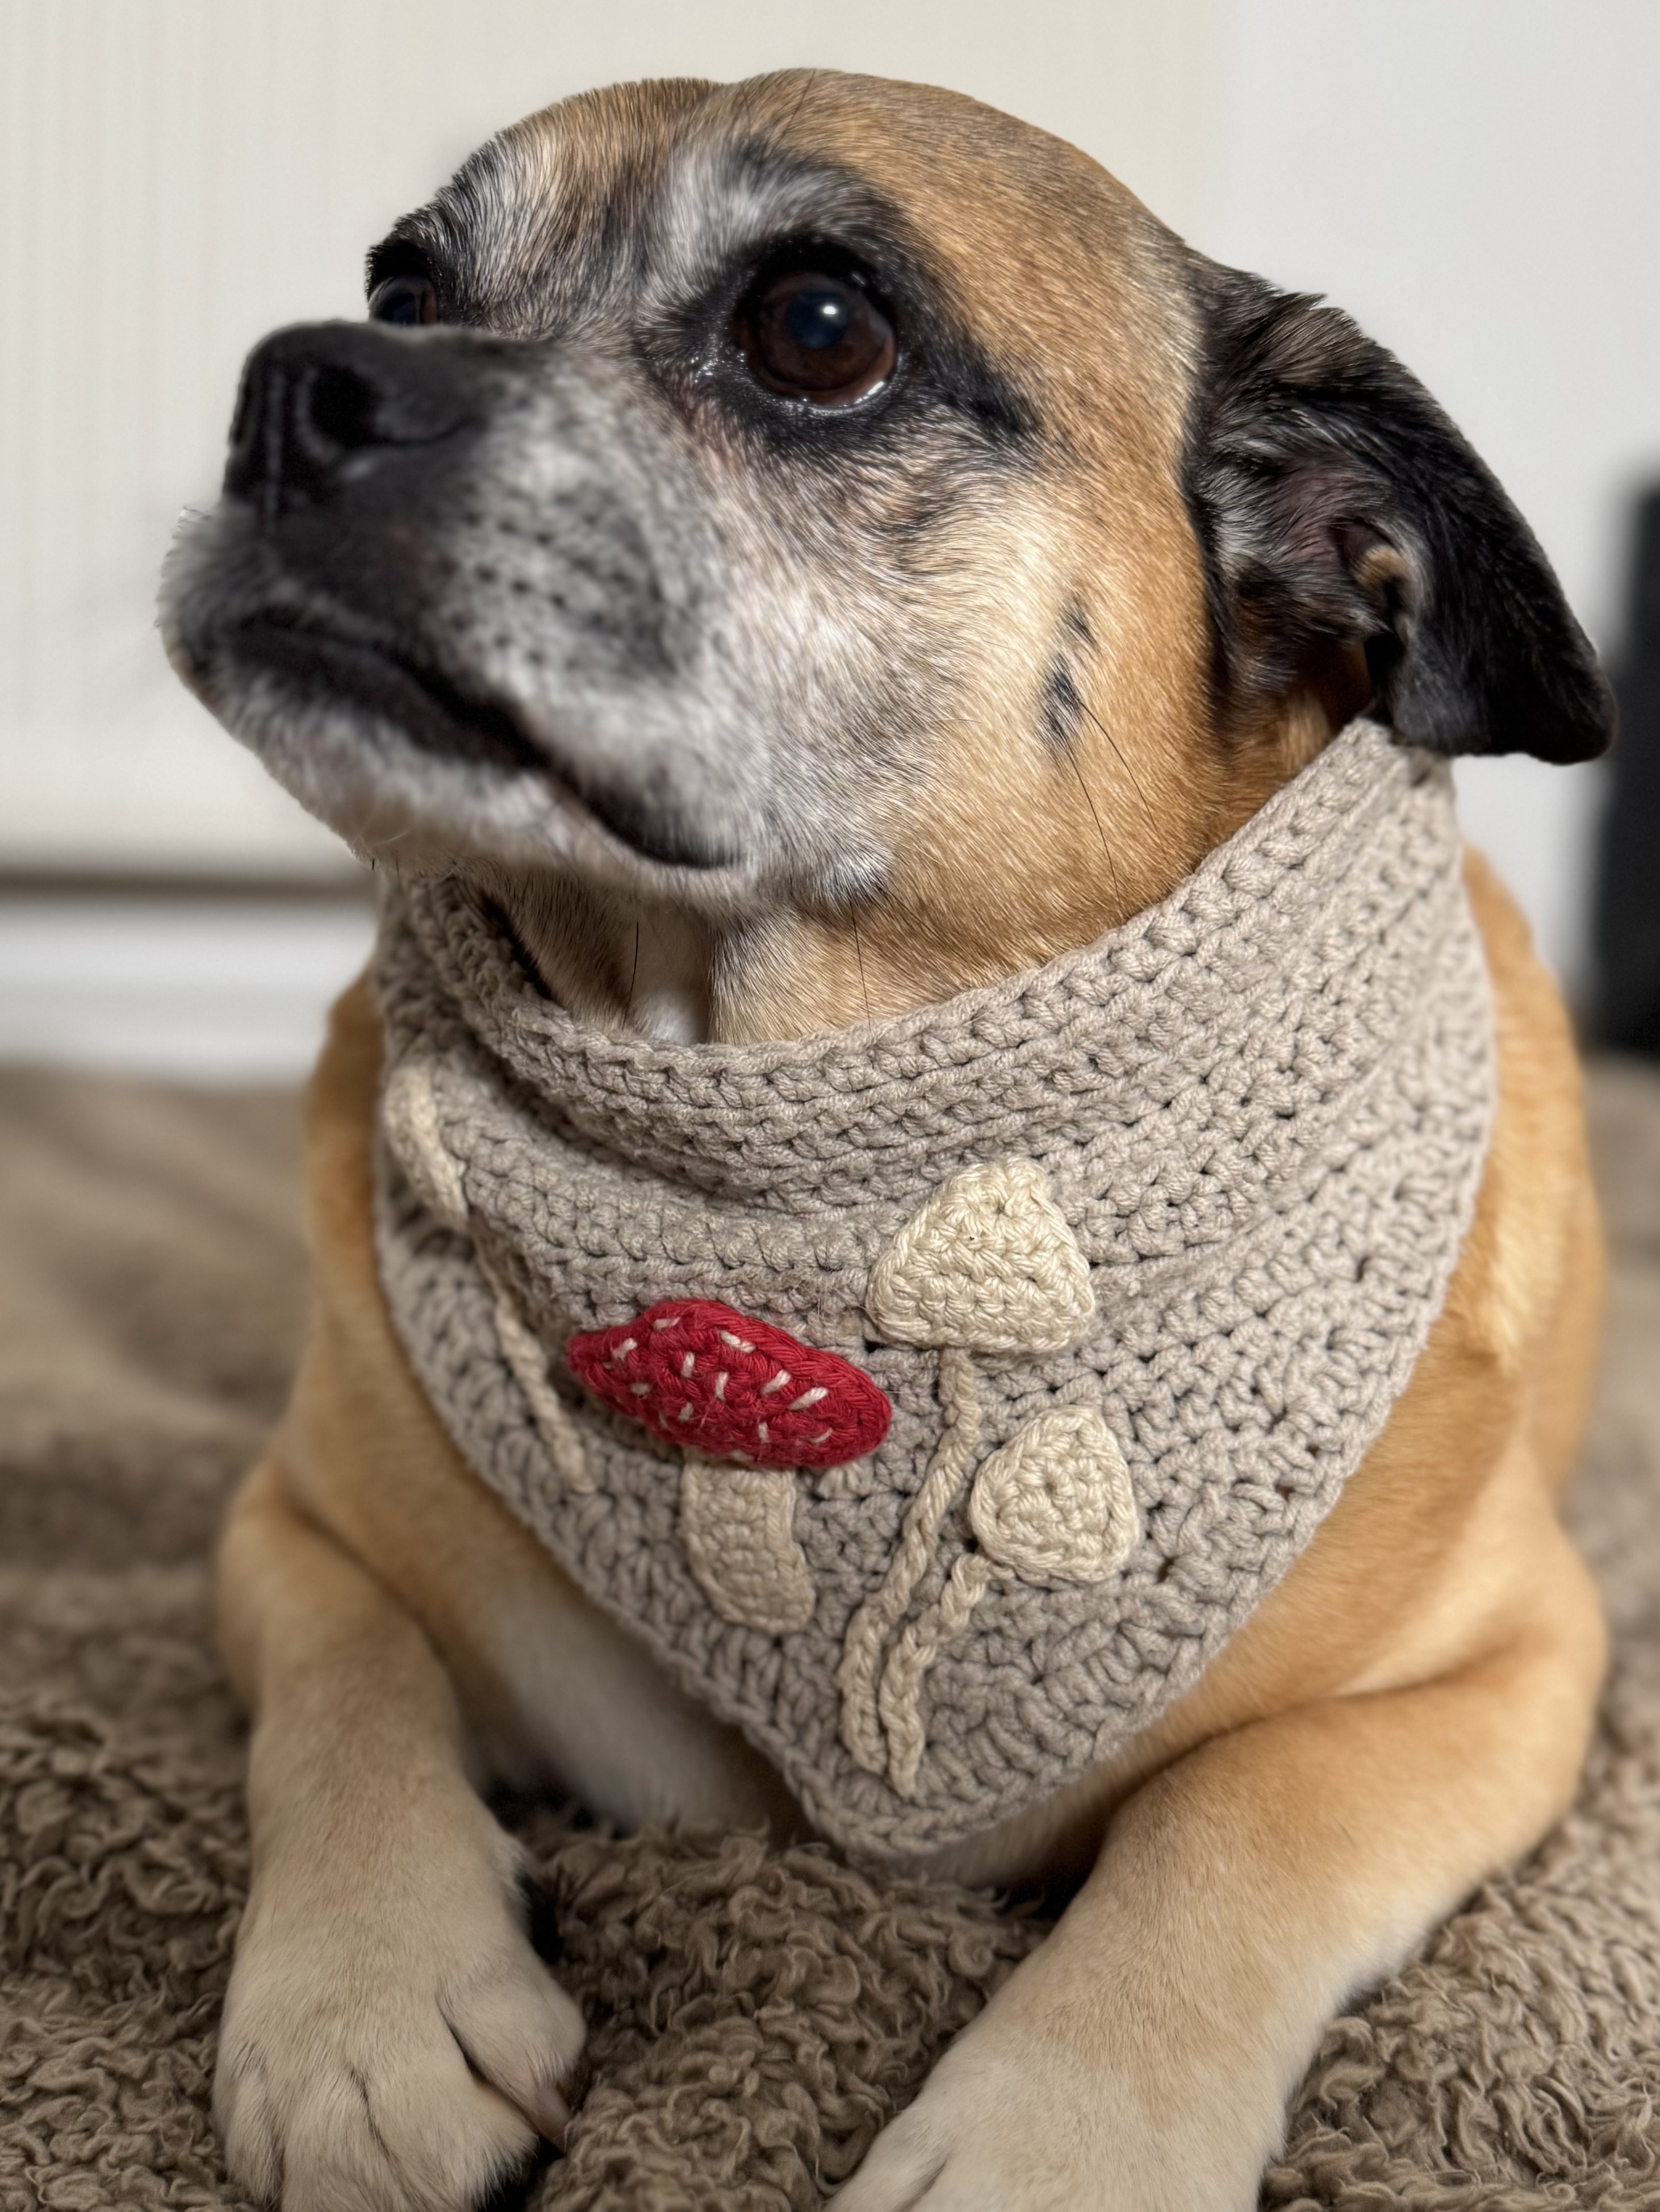
And there you have it—The Woodland Shroom Forager!
Your handmade bandanna is complete and ready to wear. Now it’s time for your furry friend to model their new look! Don’t forget to share a photo and tag me on Instagram so I can see your adorable creations!
Russell (my dog, pictured above) would also love to see your furry little foragers rocking their new bandanna, so please tag him too!
Instagram:
@hookedandtaylored
@russell_the_pugx
Pawfect Cowl Collar Cover
Bring a little extra coziness—and a whole lot of cuteness—to your furry friend’s wardrobe with this charming cowl scarf. Designed to slip comfortably over a standard pet collar, it adds softness without getting in the way of tags or hardware. The star of the piece is a sweet paw‑print appliqué, adding a playful touch that celebrates the pets who inspire our stitches in the first place. Whether you’re crafting for chilly walks, adorable photos, or simply to spoil your companion, this quick and satisfying project is a delightful addition to any maker’s collection.
This beginner-friendly pattern is worked in rows using basic crochet stitches and the size is fully customizable.
Grab your yarn and hook—let’s make something special for your best friend!
| Materials | |
| Yarn: | Paintbox Yarns Cotton Aran: Elephant Grey (661) – 1x 50g ball Black – scrap ends |
| Hook: | 5 mm |
| Other: | Yarn needle |
| Abbreviations (US) | |
| Ch | Chain |
| St | Stitch |
| Sl-st | Slip stitch |
| Sk | Skip |
| yo | Yarn over |
| Sc | Single crochet |
| Dc | Double crochet |
| Hdc | Half Dc |
| Dec | Decrease |
| Inc | Increase |
| FP | Front post |
| BP | Back post |
IMPORTANT PATTERN NOTES
CUSTOM FIT
Every pet is unique in species, shape, size, and proportions. For that reason, this pattern does not include fixed measurements. Instead, it’s designed to be fully customizable—simply crochet the desired FCR length and continue adding rows until you reach the size you need. This makes it easy to create a perfect fit for any furry friend!
YARN CHOICE
Since the size is completely customizable, the yarn choice is too! Feel free to use any yarn you like—the pattern works best with weights ranging from light to medium. For comfort and safety, choose soft, non-irritating fibres that are gentle on your pet’s skin, such as cotton blends.
https://www.youtube.com/@hookedandtaylored
STEP 1: MAKE THE COWL
The cowl is crocheted in flat rows.
Measure your pet’s neck and decide on how snuggly you want the cowl to fit. For a snug fit, crochet a FCR that exceeds your pet’s neck size by ~2cm. For a looser fit, simply chain more on the FCR.
FCR: Ch an even number (as many as you need for your pet’s neck size) +2 turning Chs.
Row 1: Dc in 3rd Ch from the hook and each Ch across.
Rows 2-3: Ch2 (does not count as a stitch) and turn. FPdc around 1st st, BPdc around the next st. Continue alternating 1 FPdc, 1 BPdc across.
[For larger pets, repeat rows 2-3 as many times as you want to reach your desired width of ribbing. For smaller pets, feel free to skip row 3]
Rows 4-5: Ch1 and turn. Hdc each st across.
Repeat rows 4-5 until you have a cowl that reaches the length that you want.
Row 6: Ch2 (does not count as a stitch) and turn. Dc each st scross.
Ribbing: …
Fasten off and leave a long tail end for sewing.